

Create CLI apps the easy way with cac in less than 50 lines
Let's create a simple tool to shorten links instantly from CLI's.


Hello 👋
I've never built a CLI app before, but when I was building the helper CLI tool for Hyperdocs, I realized that building CLI apps are not hard at all! Before building the CLI, I did a lot of research about the available tools and I've figured out the best way to build CLI apps that I never came across in any of the available blogs/tutorials on internet. So I just thought of writing one!
Let's see how to create a simple CLI app to shorten links.
We will be starting from scratch i.e just with an empty folder to a perfect dev workflow where you can preview commands of cli as you code them and publishing it to npm and managing releases on GitHub.
Here's are the features of our CLI app
- Shorten links with single command
- No auth required
- Shortened link gets copied to clipboard
I'll call mine - Linkk

What are we building
Let's start
Run npm init without the -y flag so that you can set up the required fields in package.json
This is what I had to do for linkk
npm init
This utility will walk you through creating a package.json file.
It only covers the most common items, and tries to guess sensible defaults.

See `npm help init` for definitive documentation on these fields
and exactly what they do.

Use `npm install <pkg>` afterwards to install a package and
save it as a dependency in the package.json file.

Press ^C at any time to quit.
package name: (linkk)
version: (1.0.0) 0.0.0
description: A simple tool to shorten links from CLI.
entry point: (index.js) dist/index.js
test command:
git repository: https://github.com/lalit2005/linkk
keywords: link-shortener, url-shortener, linkk, url, link
license: (ISC) MIT
About to write to /Users/kishore/Documents/Lalit/Coding Projects/Web Development/linkk/package.json:

{
  "name": "linkk",
  "version": "0.0.0",
  "description": "A simple tool to shorten links from CLI.",
  "main": "dist/index.js",
  "scripts": {
    "test": "echo \"Error: no test specified\" && exit 1"
  },
  "repository": {
    "type": "git",
    "url": "git+https://github.com/lalit2005/linkk.git"
  },
  "keywords": [
    "link-shortener",
    "url-shortener",
    "linkk",
    "url",
    "link"
  ],
  "author": "Lalit",
  "license": "MIT",
  "bugs": {
    "url": "https://github.com/lalit2005/linkk/issues"
  },
  "homepage": "https://github.com/lalit2005/linkk#readme"
}


Is this OK? (yes) y
Installing dev dependencies
To build the app, we will be requiring some devDepencies
tsup- for bundling the code.tsuphelps bundling code without any config!cac- is a library that makes building CLIs easy. It just has 4 APIs, so learning it will not take time at alltypescript- let's build our cli in TSnp- this makes publishing and managing releases a cake walk
Make sure you install all these so that we can get started easily
Set up
Let's set up some scripts in package.json
build
Although we can publish npm packages without bundling, we will be doing it so that we ship a single file in the package and tsup uses esbuild under the hood, so you don't have to worry about waiting for the build.
So add "build": "tsup src/index.ts --format cjs,esm --clean --minify",
This points tsup to the index.ts under src directory and asks it to bundle it into cjs and esm formats and also it asks tsup to clean and minify the output
dev
This command helps re-bundle the code after each save of the file. Re-bundling happens in the blink of an eye as it uses esbuild under the hood.
This is just the build command with a --watch
tsup by default bundles and saves the output to dist/ directory
Here's how my final scripts field in package.json
"scripts": {
    "build": "tsup src/index.ts --format cjs,esm --clean --minify",
    "dev": "yarn build --watch",
    "prepublish": "yarn build",
    "test": "echo \"Error: no test specified\" && exit 1"
  },
Adding .npmignore
.npmignore let's you have a fine grain access of what's going to get published on npm registry
We will be just adding node_modules/ to it.
Editing package.json
Add these fields to package.json
"main": "./dist/index.js",
"module": "./dist/index.mjs",
"type": "module",
"exports": {
  ".": {
    "require": "./dist/index.js",
    "import": "./dist/index.mjs"
  }
},
"bin": "dist/index.js"
Once we bundle the src/index.ts, tsup will place the output in dist/index.js file. The main field points to this file here. Read this blog to find out more about bundling your code.
Setting up shorten command
We will be using the shrtco.de's free api to shorten links without any auth.
So let's create the src/index.ts file. This is where the main logic of the app resides.
Shebang
We should be adding shebang to the top of the main file to use node while executing the code.
#!/usr/bin/env node
Previewing
To see how the CLI works, you must first link it with yarn or npm. This just takes a single command:
npm link
or with yarn
yarn link
This lets you use the package anywhere in your device w/o installing. Now you can run linkk shorten <link> and check if this works.
Using cac
If you have never built a cli app before, I recommend getting started with cac. This is a much smaller and simpler alternative to other libraries such as commander.js.
import cac from "cac";

const cli = cac();

cli
  .command("shorten <link>", "Shorten a link")
  .action((link) => console.log(link))

cli.parse()
This code above creates a shorten command for our cli app with a link input. And once the linkk shorten google.com command is used we will be logging it to the console.
Let's build the main logic now
Shortening links with API
axios
  .post(`https://api.shrtco.de/v2/shorten?url=${link}`)
  .then(({ data }) => {
    // Stop loader
    // Copy short link to clipboard
    // Log shortened link to console
});
Checking for valid url
We will be using the is-url library to check if the provided string is a valid link or not.
If the string is not a valid url, the app quits with an error message.
The error message is coloured in red with the help of the chalk library
import isUrl from 'is-url'
import chalk from 'chalk'

if (isUrl(link) === false) {
  console.error(chalk.red("Please provide a valid URL"));
  process.exit(1);
}
Loading spinners
To display loading spinners, we will be using the loading-cli library.
import loading from 'loading-cli'

const load = loading("Shortening link...").start();

shorten(link)
  .then(() => {
    load.stop()
  })
Copying to clipboard
Let's use clipboardy to copy the shortened link
import clipboardy from 'clipboardy'

shorten(link)
  .then(() => {
    clipboardy.writeSync(link);
  })
Finishing
Now we saw different pieces of code in the main src/index.ts file, let's combine them now
#!/usr/bin/env node
import axios from "axios";
import cac from "cac";
import chalk from "chalk";
import clipboardy from "clipboardy";
import isUrl from "is-url";
import loading from "loading-cli";
const cli = cac();
cli
.command("shorten <link>", "Shorten a link")
.alias("s")
.action(async (link: string) => {
if (link.startsWith("http") === false) {
link = `http://${link}`;
}
if (isUrl(link) === false) {
console.error(chalk.red("Please provide a valid URL"));
process.exit(1);
}
const load = loading("Shortening link...").start();
axios
.post(`https://api.shrtco.de/v2/shorten?url=${link}`)
.then(({ data }) => {
load.stop();
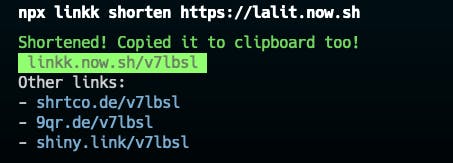
const shortLink = `linkk.now.sh/${data.result.code}`;
console.log(chalk.green("Shortened! Copied it to clipboard too!"));
// copy to clipboard
clipboardy.writeSync(shortLink);
console.log(chalk.bgGreen.black(` ${shortLink} `));
console.log(`Other links:
- ${chalk.blue(data.result.short_link)}
- ${chalk.blue(data.result.short_link2)}
- ${chalk.blue(data.result.short_link3)}`);
});
});
cli.help();
cli.version("0.0.2");
cli.parse();
Publishing
Now that we are done with the code, it's time to publish it to the world so that everyone can start installing and using this.
For publishing packages and maintaining releases in the future, we will be using np. Just type in np in terminal and it let's you release the next version in an interactive manner. For example, this is what I had to do to release linkk@v0.0.2
You might have to add the
--no-testsflag to avoid testing while releasing as we have't added tests in this tutorial
np --no-2fa --no-tests


Publish a new version of linkk (current: 0.0.1)

Commits:
- fix: show version  d246822
- fix: link  a430f8a

Commit Range:
v0.0.1...master

Registry:
https://registry.yarnpkg.com

? Select semver increment or specify new version patch     0.0.2

  ✔ Prerequisite check
  ✔ Git
  ✔ Installing dependencies using Yarn
  ✔ Bumping version using Yarn
  ✔ Publishing package using Yarn
  ✔ Pushing tags
  ✔ Creating release draft on GitHub

 linkk 0.0.2 published 🎉
Once np pushes the tags, it will open a new GitHub release page with auto-generated content. You will just have to check if everything's right and just press that green button to release it on GitHub.
Using npx
Once the package is published, we can use it with npx too! Also no configuration is required from our side.
Handly links
- GitHub repo - github.com/lalit2005/linkk
- Linkk on npm - npm.im/linkk
What next?
Let's see how you can continue iterating and releasing your cli app after this
- Run
yarn dev. - Make sure
yarn linkis run. - Start coding your new command.
- Test it in a playground directory by running the command there.
- Once it's done, release it with
np🎉 - You can run
yarn unlinkin the directory and install it elsewhere to test the published version of the package. I just open a new Gitpod workspace and test the published version there
Thanks
Thanks for reading the article, let me know if you found this useful.
Please drop your comments below :)